
new 10/17/02, updated 11/30/02,12/28/2003
Time required: 2-3hours
Tools needed:
-These instructions
-#15 Torx wrench
-9/32 wrench
-2 tap wire splicers
-Rubber cement or double sided tape
-Pliers
-Flashlight
-Cable ties (optional)
As a precaution, I disconnected the battery prior to beginning installation.

1) Remove the two 9/32 bolts holding the instrument cluster trim panel. Once removed, pull on the corner of the trim panel to pop the clip out on each side that holds the panel in place. It will take some force to pop them out, so be careful. Remove trim panel and set aside.
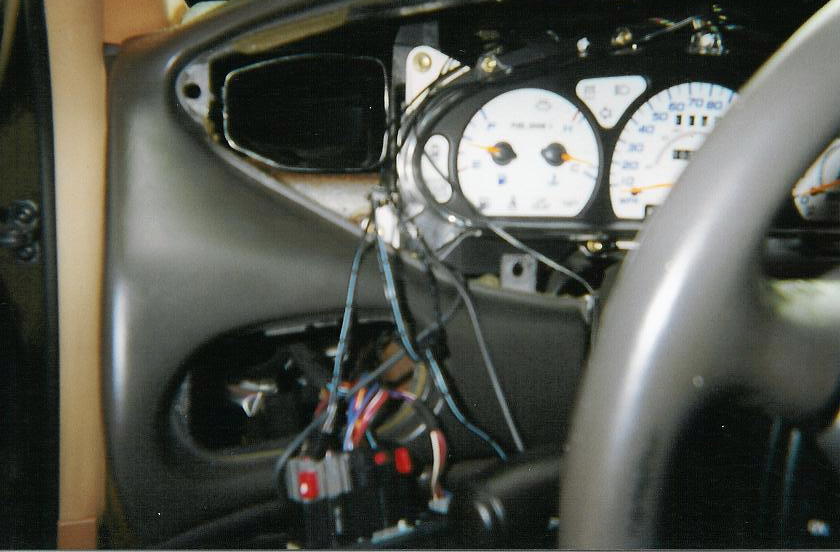
2) Remove the four 9/32 bolts holding the instrument cluster to the car.
3) Remove the instrument cluster assembly from the dash. You will need to reach behind it and disconnect the (two or three—depending on year) interface cables that are connected to the back to get it all the way out. Be careful not to scratch the clear plastic cover of the instrument cluster while removing or reinstalling it.
4) Reach down behind the dash through the instrument cluster opening to the light switch assembly. You can also reach it from under dash, but I found this easier. On the top and bottom of the light switch assembly are little pegs that slide to the right (toward passenger side; 2 on top, 1 on bottom). Slide one or more of these pegs to the right while gently pushing out (moving one will move all, but it is easier if you push on one on the top and bottom at the same time). Once the pegs have slid far enough to the right, the switch assembly will pop right out. Pull the wiring out as far as it will go.
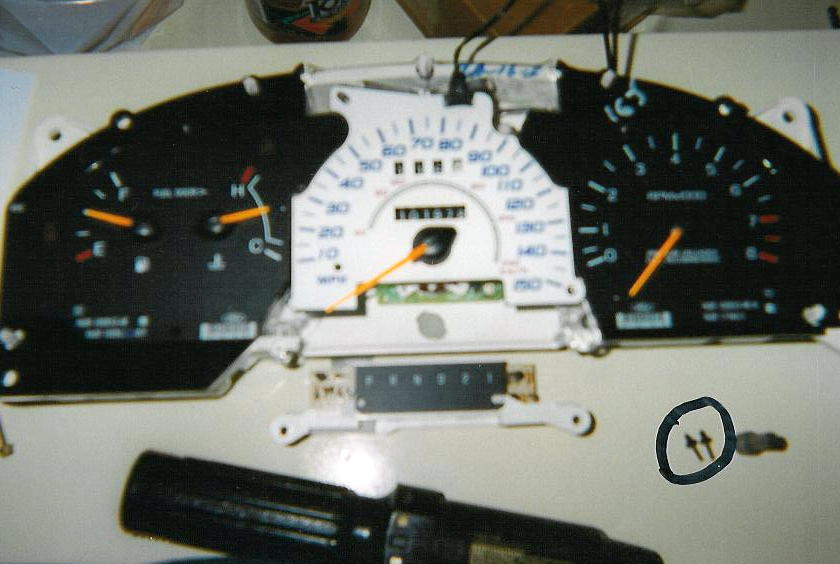
5) I moved inside for the instrument cluster disassembly. Remove the six #15 Torx screws holding the clear plastic cover of the instrument cluster. Now remove the two additional Torx screws that hold the interior gauges bezel. After the plastic cover is removed, remove the two small pegs that hold the speedometer and tachometer in the “zero position” These pegs (circled in picture) pop right out with a little force. (Notice how the speedometer and tachometer needles fall below the “zero position”, this will allow for easier installation of the new gauge faces).
6) Do one gauge faceplate at a time. Practice putting each gauge over the needles before using adhesive (you can move the needles to accommodate). For the left gauge face, gently point both the fuel needle and the temp needle in the up position (they should be at 12 noon and parallel to each other). Be careful not to snap the needles, you can bend the new faceplates to slip them around the needles.
The hardest part of the install is making sure you get correct alignment of the gauges so that the indicator lamps will shine through properly.
7) Apply adhesive sparingly (glue, tape, etc.). The key area to cover is the middle and center of the gauge (but don't use too much). Try to not cover where the indicator lamps will shine through with the adhesive.
8) Slide the new gauge over the needle(s) while aligned as close as possible to where it will be seated. Apply pressure to seal adhesive and hold up to light to align indicator lamps (it may be helpful to remove bulbs, though I didn't... and mine ended up ever so slightly off). Clean up any excess adhesive immediately.
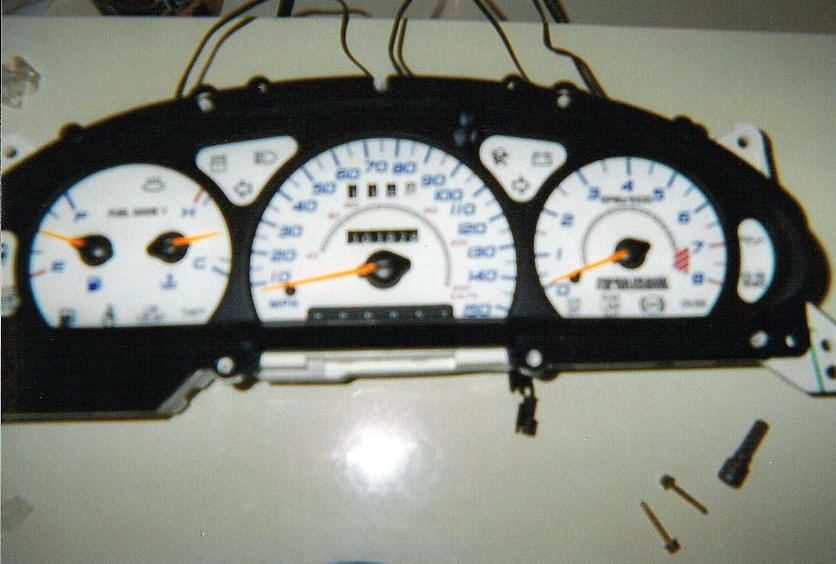
9) After doing all three gauges (depending on the adhesive used, you may need to allow drying time), reinstall the inner bezel and clear plastic cover of the instrument cluster. The gauge wires will fit under the bezel. (Top of the above picture)
10) Back out at the car, connect the gauge wires to the switch/power assembly provided with the gauges, and place the instrument cluster back into the dash. (With my kit, There were three male connectors—one for each section of the dash--and four female connectors. Any three female connectors will power the gauges—you will be left with one open connector, this is Okay). I used two small cable ties to group the wires together; just for neatness (this is optional). Run the wires/switch assembly down through the dash with the switch dropping down below the dash and the power assembly seated behind the dash (you can set/glue/tape it behind the dash, below the light switch assembly). After reconnecting the two interface cables, reinstall the four instrument cluster mounting screws.
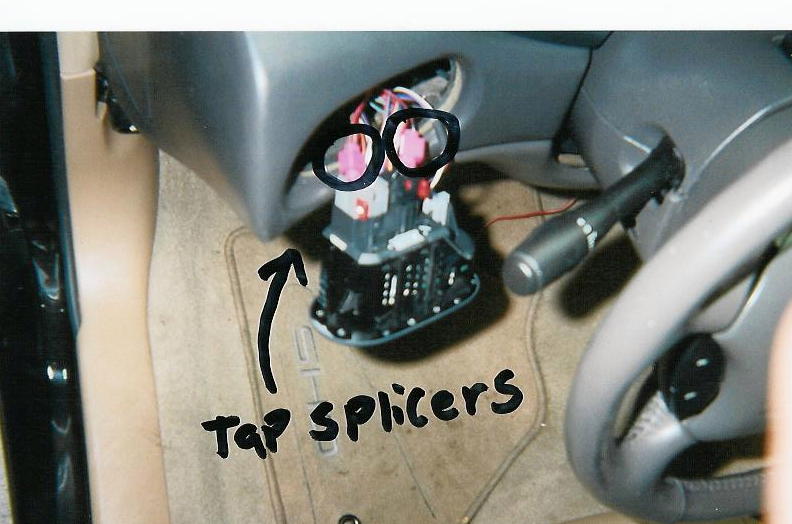
11) Pull the red and black gauge power wires out through the light switch hole. The light switch has three harnesses plugged into it. The two big ones are the ones we're interested in. Each big harness has two banks of wires, one with four wires and one with three. The (B)lack ground wire from the gauge power goes in the one terminal with the black wire (middle harness, three wire bank, opposite missing terminal). The (R)ed power wire from the gauge power goes in the one terminal with the light blue wire with a red stripe. These wires must be spliced into the existing wires using the two tap wire splicers (here is where you need to reasonably know what you are doing). Use the pliers to connect the wires to be spliced. This will turn the gauges on whenever the parking lights and/or headlights are on.
Wiring diagram
Light switch pulled out from dash, looking from behind...
(bottom of switch)
_________ _________ _______
| | | | | | | | | | | | | | | |
_________ _________ _______
|(R)| | ||||| |(B)| | |||||
_________ _________
(top of switch)
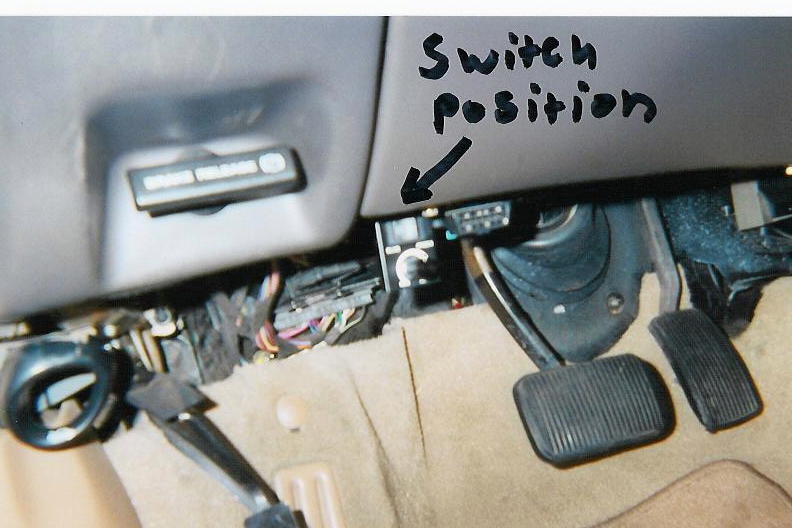
12) Once wired, reconnect the battery and test the gauges. When working, reinstall the light switch by pushing the assembly back in until it clicks in place. Reinstall the instrument cluster trim panel and bolts.
13) Attach dimmer/color switch to under side of dash.
Notes:
-These faces are extremely bright, so you may want to adjust the brightness via the control switch.
-IMHO, when the selector switch is on “blue” it looks closest to stock.
-On the 96-98 model SHOs the LOW WASHER FLUID and SEATBELT indicator lights are opposite from the 99 models. The white face gauges accommodate the 1999 model.
-The 96 model SHO has three interface cables in the back of the instrument cluster (Presumably because of the shift position indicator). The 99 model has two interface cables. 97&98--???
Instructions created by Damon Koch (99 VW) and Martin P. Morawski (96 ES)
For informational purposes only; proceed at your own risk
Any errors or omissions are not the responsibility of Koch, Morawski, or V8SHO.com
ProCarParts
www.procarparts.com
4364 Baldwin Ave.
El Monte, CA 91731 USA
Phone: 626-350-0286
Fax: 626-350-0390
E-mail: customerservices@procarparts.com
Direct Link to 96-99 FORD TAURUS SHO EURO REVERSE GLOW GAUGES...
http://www.procarparts.com/store/displaydetails.cfm?pid=FRD-TSHO-9699-RIG
I bought mine from procarparts.com, only I purchased them through Ebay. They are
$64.95 via their website link above. I recommend buying them through Ebay, as
they have the same gauges currently listed for a $39.95 opening bid (see link
below that ends this time tomorrow). I have seen a couple of other companies
also selling the same gauges on Ebay. You may want to check out some other
auction sites as well. They are well worth $64.95 + S&H, but why pay more
than you have to... Good Luck!!
Link to current auction on Ebay...
http://cgi.ebay.com/ebaymotors/ws/eBayISAPI.dll?ViewItem&item=1870064539
Damon Koch
Acworth, GA
'99 VW - 53K
PS Just so you know up front, the washer fluid and seat belt indicator lamps
were swapped on the '99 instrument cluster (these gauges evidently were modeled
with a '99 cluster). Unfortunately, they wont be an exact fit on 96-98
instrument clusters, but I understand they still look great (as it is only
noticeable at startup and when those lamps are illuminated).
Tim, Could you update v8sho.com about the indiglo gauges...they are a perfect fit for the 97-99 and the 96 has one indicator lamp that is reversed. See my statement below :)
I installed my gauges that I bought off eBay tonight. All I can say is WOW. During the day the white faces give the car a more modern appearance and at night it is spectacular. I have to say this has been the best 29 bucks I have spent. I installed them just over 2 hours ago and I'm still smiling...I'm very impressed and satisfied.
**Also, for anyone who was debating getting them because of a few indicator light changes, My 1997 had every correct indicator light in the correct place. My best guess is that 96 is the only different setup regarding the indicator lights because they actually had a working low washer fluid light. So these gauges should fit the 97-99's perfectly. Tim, Please update v8sho.com on the fitment of these gauges.
Also, when mounting the dimmer switch, It fits perfectly next to the OBD connector...and in fact all you have to do is unscrew one of the screws out of the OBD connector and use it to hold the OBD and the dimmer switch so no drilling is required.
Thanks
Greg
97 TR
_______________________________________________________________________
Couple of months ago I shot out an email about the lights just quitting on my white face gauges. Several suggestions were sent in that were all very helpful.
Last Saturday, finally got the time with the help of BIL to pull bezel and root around. Reason I didn't think it was the inverter is that they mysteriously came to life about a month ago for a fleeting moment. AHA!!
When we installed the gauges we used the piercing wire clips supplied with the kit. Turns out that one barely pierced the jacket and may have had contact with all of maybe two strands of wire.
In the crap can they went, out came the soldering gun, badda bing badda boom, Houston we have lights.
If those that have these kits experience this problem, I would definitely check this out first before spending $20.00 to replace the inverter.
U.L