
Home | Mailing List | Specifications | Care and Feeding | Modifications | Vendors | Literature
new 3/27/2004
Elsewhere in this section you will find articles on intake/MAF theory, how to
remove the restrictive “Saxophone,” the “Porterized intake” solution, and the
“Open Cone Filter Variant.” I’ve tried all three and would like to pass along
these important lessons and my own variant.
My Dad and I live here in Southern California – he has a ’98 Taurus V8 SHO and,
as with most SHO owners, my Dad believes you can never have “enough” horsepower.
I’ve inherited his sickness and seem to get dragged into most of these
misadventures right along with him. Unfortunately neither of us is what you
would call “mechanically inclined,” and we rarely seem to have the right tools
for the job, but we do manage to learn some valuable lessons along the way.
In regards to the general theory about improving the stock intake system of any
vehicle the simplest explanation I’ve ever read went like this:
Plug your nose and breathe with your mouth through a straw for at least 2
minutes, you can exhale through your whole mouth. Hard, isn't it? That's similar
to what the stock air box/filter does to the engine. Now do the same thing with
your mouth open. Tada, easier! You may have also noticed that it took less time
to get your lungs full of air! That is similar to most air box/filter mods, less
work & more air when you need it (aka NOW). --
http://fordx4.corpsie.com
So the general idea seems to be that stock intake systems restrict airflow,
presumably for purposes of noise reduction, by moving the intake point out of
the engine bay (i.e. the SHO “saxophone”) and adding additional baffling similar
to a muffler. So even if you add a K&N panel filter to your SHO’s stock air box
with the intent of allowing for higher CFM’s into the intake manifold, the
saxophone still causes the engine to work harder to draw in that air (think
about that drinking straw), and prevents it from drawing in the air as quickly
as it could without the saxophone in place.
So while I agree that the saxophone must go (it’s hard to argue with the straw
theory) before you embark on removing your saxophone you should know that there
wasn’t really much in the way of baffling inside the one we removed from my
Dad’s ’98 SHO. The saxophone tubing is roughly 2.5-3” in diameter, makes some
fairly smooth turns, has no baffling anywhere from end to end, only had one
short resonator in the middle, and had a couple of cross-drilled holes above the
resonator to draw in additional air right before it went through the fender
well. All in all not a bad design. But using the straw theory a shorter tube, or
no tube, would allow the engine to draw in more air quicker, and with less
effort.
With this in mind I found myself following the procedure in Al Primm’s article
on “Saxophone/Mousetrap removal.” Almost everything went as Al described,
except…..1) the “gold protrusion” that Al refers to next to the battery box is
the head of a 1” tall brass vibration mount and to remove it you need a 13-14mm
socket that is deeper than standard – what you really need, in addition to the
6.25” drive extension, is a 2” deep 13-14mm “spark plug” socket – that’s what
finally did the trick, 2) the whole operation was made easier once I started
using a pivoting-head ratchet driver to angle around obstructions, and 3) you
don’t actually have to remove the MAF to get enough slack to move the air box
out of the way (I also didn’t use a jack stand but I can see how that would’ve
made life easier). Now Al’s article goes on to describe how to remove the
resonator from the middle of the saxophone assembly, but this seems like a
wasted effort. If’ you’ve gotten this far take the whole saxophone out and leave
it out – it’s not worth the pain to reinstall it. Al’s article doesn’t explain
how to remove the bottom half of the saxophone (which you’ll want to do because
it seems like it might vibrate if left in place), but there’s only one bolt
holding it in place – you’ll need the 8mm socket for this and a lot of patience
because the bolt head is right below the headlamp, the head faces the front of
the car, and you need to reach in from below the lower saxophone assembly and
unbolt it blind – this was made easier with the pivoting-head ratchet driver.
Now that the saxophone is gone what’s next? Well I tried to convince my Dad to
bolt the air box back in place without an inlet tube and leave it at that, but
he had already purchased a K&N Cone Filter (E-0940) so we tried the “Open Cone
Filter Variant.” There’s a couple issues here to be aware of: 1) there’s no
place to properly mount the oxygen sensor when you’re done and this results in a
Check Engine light – which in California means you won’t pass your next smog
check, 2) drilling the pilot holes into the base of the K&N cone filter resulted
in little metal filings dropping inside the filter which I was unable to shake
out and I’m fairly certain they ended up getting sucked into the engine, and 3)
the MAF turned out to be plastic, not aluminum like the pictures, and we broke
off two corners trying to remove those MAF bolts because the nuts were stripped
(and because we weren’t using the right tools). The Cone Filter results were
phenomenal, throttle response was instantly improved, but it was that persistent
CE light that eventually made us put the stock air box back (with a K&N panel
filter of course).
That left us with the “Porterized intake” mod, which seems fairly simple and
inexpensive, but I wasn’t thrilled with going from three fixed mounting points
to only leaving one loose bolt holding the air box in place. Again I suggested
leaving the air box as is with the opening exposed to the engine bay and no
inlet tube – after all the theory behind the Exposed Cone Filter is that engine
bay temperature in a moving vehicle is only 1 degree warmer than ambient air -
but my Dad said he would prefer something that looked stock, so we compromised
with our own variant: The Troxel Intake Mod.
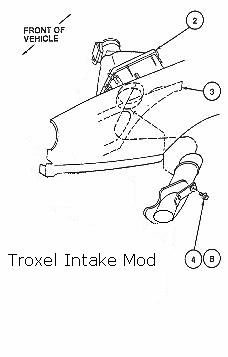
We took the upper assembly from the original saxophone and made a hacksaw cut 1”
below where the intake tube passes through the fender well, just below the
bracket with the 8mm bolt that mounts inside the fender well (#4 in the sax
drawing) cutting off the resonator section. Then we used some sandpaper to
smooth out the edges of the cut and remounted the new shorter intake tube by
passing it up through the fender well, re-inserting it into the air box, and
putting the 8mm bolt back into bracket #4 inside the fender well. This left us
with a solution that kept the air box firmly mounted, required no additional
parts, looked stock from the engine bay, and (combined with the K&N panel
filter) provided better throttle response with a more aggressive intake note.
Thanks to Mike for putting a different spin on the modification to the intake.
U.L.