
new 2/12/03, updated 1/4/2004,1/11/2004
My IMRC cable broke recently but I didn't want to spend the $ to replace the whole thing, so at the suggestion of some of the list members, I went out in search of someone that could make a custom cable to replace the broken one. I finally ended up at a little basement shop that specializes in old motorcycle restorations. They were able to fashion a perfect replacement, creating an end that fit perfectly into the plastic wheel fitting inside the IMRC box.
I need to make a slight adjustment on the secondary butterflies as I believe they are slightly open all of the time, but at least I have my secondaries back!
For those of you who have experienced the broken cable, this may be a viable alternative for you. As for the broken plastic wheels, not sure if you can do anything, other than replace the whole box.
I also highly recommend following Kirk's instruction to clean the butterflies to avoid the excessive tension on the cable in the first place. I did grease the cable up well, but still need to go back in to clean the butterflies.
George
96 ES
I was sneaky and wasteful, I purchased a used IMRC and tossed my old one. I could laugh about fixing the IMRC which is meant to be serviced as an assembly except they cost $250 new and I don't now when Ford may run out of them.
Nice work George.
Buford
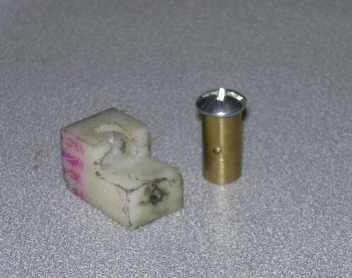
Depending on how handy you are and what kind of power tools you have at your disposal, just fabricate one of these nylon blocks and pick up one of the pictured Brass cable stops (tranny kickdown cable stops available at any auto parts store). This one was at one time installed on my 96. Cut the block with band saw, drill the hole for the cable, and then machine in the "clip" portion with a Dremel. Took all of bout 20 minutes for me at my dads as we found the clip on my 96 was broken when we tore it down, Dremel a bit, test fit, Dremel some more, you get the picture...
Otherwise find someone who has a broken IMRC, chances are the plastic wheel inside is what broke on theirs, then you could just change out the cable. But in reality plan on an hour or so to get that box all apart and change the cable as those boxes are sealed up tighter than Fort Knox. IF you fabricate an end
you won't have to tear the box apart, just carefully cut off the current stop that is crimped on the end of the cable (Don't get into the cable strands themselves) then remove it. Slip your new end on and put the bras stop where the cable just barely goes through it. With the butterflies closed and the cable hooked up there should be a good deal (1/8" or so) of slack in the cable (pull the cable all the way out first), it shouldn't be tight under tension. If the cable is too tight you can tweek the bracket that the cable end clips into slightly to get the amount you need.
Either that or pony up the 100 or so for a new IMRC box...
Good luck, Picture attached, mine is kinda crude but it worked just fine!
Scott
Scott,
My IMRC box does not have another pulley. I will take a pic of it and send it out when I get home tonight. Mine just has the cable through the box and on a single white plastic pulley which rides on a shaft which is permanently staked down in the box. All of the other gears, (all
metal) can be removed by taking out the screws holding down there shafts but not the pulley shaft.
And for those of you that open up your IMRC box to take a look, note that there is a mosfet (Metal Oxide Semiconductor Field Effect Transistor) device on the circuit card which is held down with a small white, "in my case anyway" nylon/plastic hex head screw that sets in what looks like a hole in the circuit board. It looked like some kind of adjustment screw so I didn't even think to touch it as I gently
pried the board up to take a peek. "POP" goes the little nylon/plastic head. If this transistor device is not reset back against the
metal box body for heat sink you may run into trouble down the road.
Thanks,
Brian
First of all I would like to thank all of you for your invaluable input on 'all things V8'..
I too had the infamous IRMC pulley disintegrate on me about a year ago. After checking some prices I decided to try to fix the thing myself.. J-B Weld lasted about 150 miles, and changing the cable over to the other pulley led to the inevitable within 500 miles.. The polysomething that the pulley is made from has obviously been manufactured by the lowest bidder.
I did, however, manage to fix the problem at no cost to myself, other than spending around 2 1/2 hours with my Dremel.
First use a solder gun to remove the board holding the electronic gadgetry, then remove the clips holding the 'axles' for the gears and the pulley. In order to replicate the pulley itself I used two metal washers of approx. same size which sandwiched two smaller washers (with same diameter hole as the large ones) Since the rod holding the pulley has metal (non-removable) stops, which prevent you from simply sliding the washers on, I used the Dremel to cut out a wedge from each washer, big enough to allow the rod. Once on the rod I offset the holes created by the wedges and fastened the washers to each other with a tiny screw through a pre-drilled hole. The perpendicular piece of metal on the end of the IRMC cable itself fit into two additional holes drilled in the outer edge of the large washers. The cable itself sits quite nicely in the groove between the middle two smaller washers. It took some playing around with washers, and I rounded off the groove-side of the smaller washers so as not to end up fraying the cable, but it has held up for me going on 10000 miles...
Just a thought for the more adventurous among you....
Ray Ketting
Podunk, Kansas
'97 PW SHO
120 k unwelded
Major Mods
_________________________________________________________________________
Hi Unc Lar,
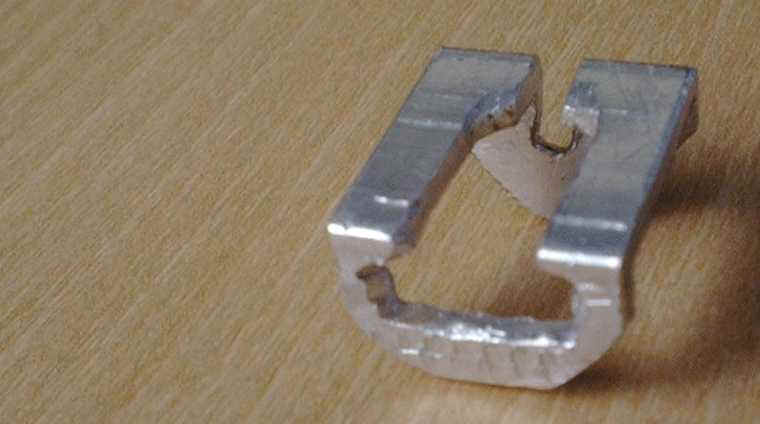
No magic, aluminum U-channel, drill, hacksaw, needle files or if your lucky a dremel. The U-channel is 1/16" made to fit over 1/2" board. I have made a couple out of 1/2" strip and bent it into a U shape. The easiest way to work the piece is to cut it off the length of material last.
jj
Above is an illustration of JJ's trick actuator arm clip. Click to enlarge.