
Home | Mailing List | Specifications | Care and Feeding | Modifications | Vendors | Literature
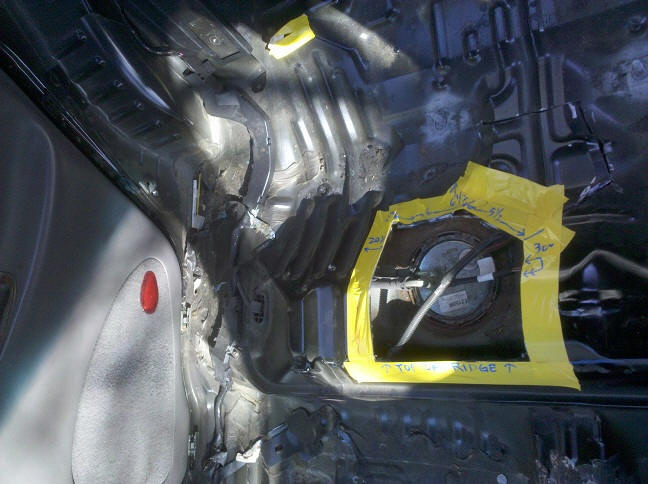
Fuel pump cutout
FINALLY. Kick out the back seat bottom cushion, layout the floor, cut
carefully, and replace your fuel pump without having to drop the tank.
The early Taurus folks have been doing this for a while. I took the opportunity
to get some dimensions for the Gen 3 cars while chopping up this 96 parts car.
Early pic. I'll do a writeup shortly.
Before people start nitpicking - I KNOW I nicked some wires and hoses, I didn't
care, I'm throwing out this car - I recommend doing this cutout with a small,
light duty Rotozip or Dremel tool and keeping your cuts shallow so you don't hit
any wires or hoses.
I used a 8" heavy grinder with a 1/4" thick cutting wheel set on "Kill".
--
Eric Lehmann
97 Ebony 42k Welded - With the Angels Now so that I don't have to be. Long Live
the Garage Queen !
97 Ebony 198k Resurrected, Welded
96 Medium Willow Green Metallic 150k, blown nomo ;-(
96 Rosemist 74k 2006 Best Of SHO, Popular Vote, 2007 Best Gen 3, Welded
96 Charcoal Grey 152k - Resurrected, Welded
___________________________________________________________________________________
Updated 11/21/10
Here's the write up of what I did.
Photo one (Wide) Shows the back seat area of a Gen 3 Taurus SHO, but SHOULD hold
true for all Gen 3 sedans(i.e. Sables too). The seat has been removed and the
carpet is out of the way.
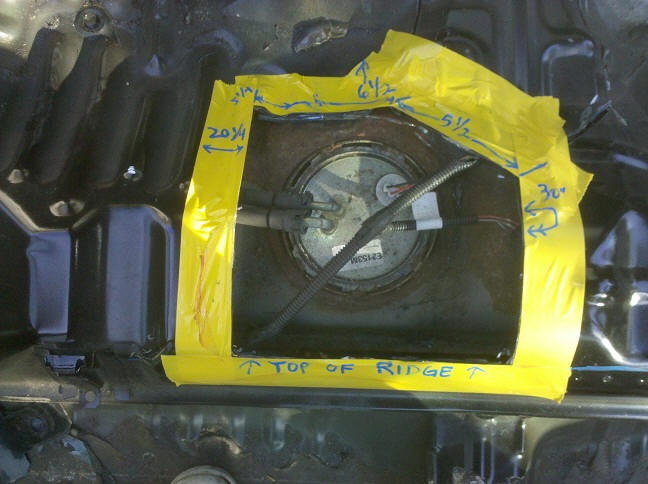
Photo two (Wide enhanced) Shows the same view with reference markings.
The key points are:
1) the body seam ridge under the door. This is what the body molding is clipped
to and what the passenger's and driver's side cut distances are measured from.
2) the floorpan under-seat main bend ridge. This is what the bottom ridge cut is
centered on.
3) the passenger's side seatbelt mounting bolt in the floorpan. This is where
the distance for the top cut is measured down from.
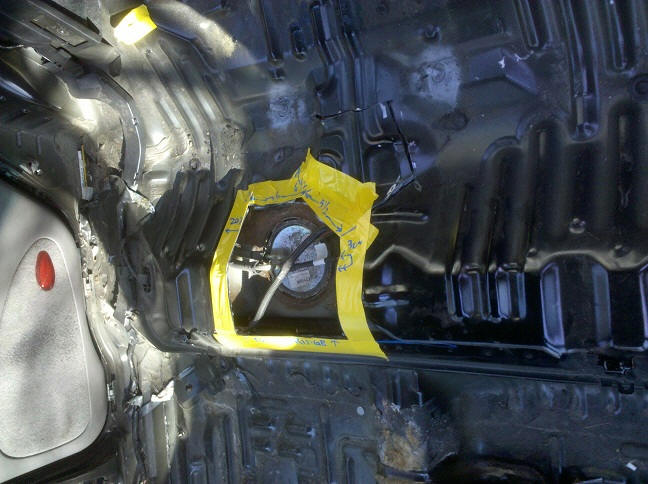

Photo three (Bottom ridge cut) Mark a line at the peak of this ridge running
from the driver's door to the passenger's door. Follow the bend point of this
ridge.
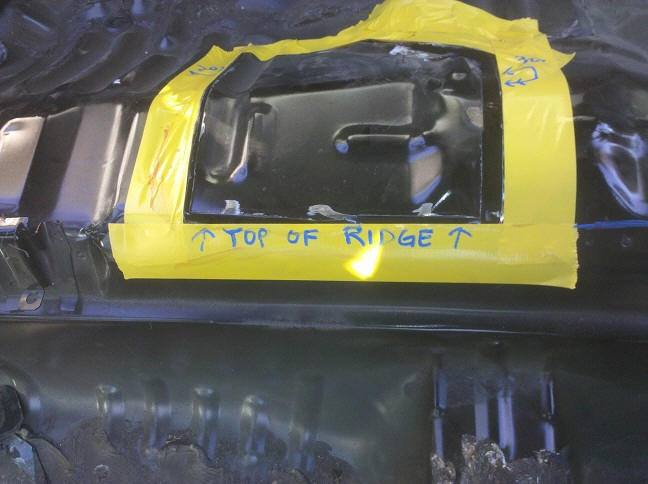
Photo four (Pass side cut) Measure 20 1/4 inches from the body seam ridge under
the passenger's rear door and mark a line running from front bumper to rear
bumper at 90' from the bottom ridge line.
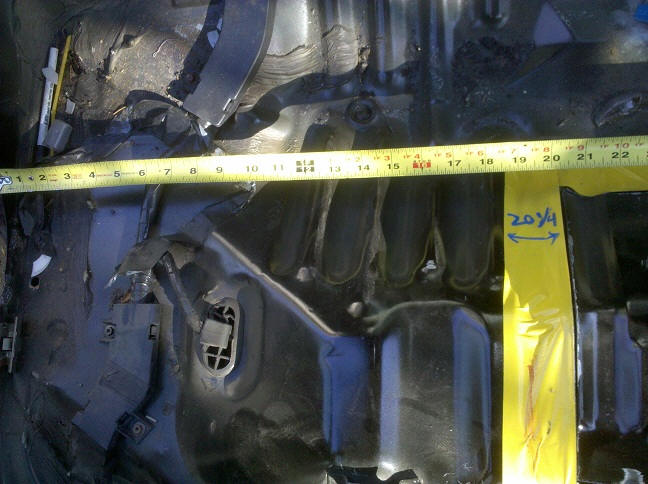
Photo five (Driver's side cut) Measure 30 inches from the body seam ridge under
passenger's rear door and make a line running bumper to bumper at 90' angle from
the bottom ridge cut line.
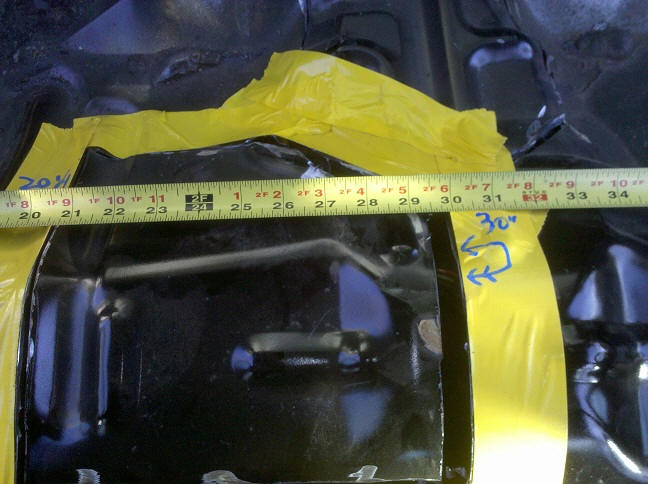
Photo six (Top cut distance from bolt) Measure 6 1/2 inches from seatbelt
mounting bolt towards the front bumper and make a line parallel to the bottom
ridge cut line.
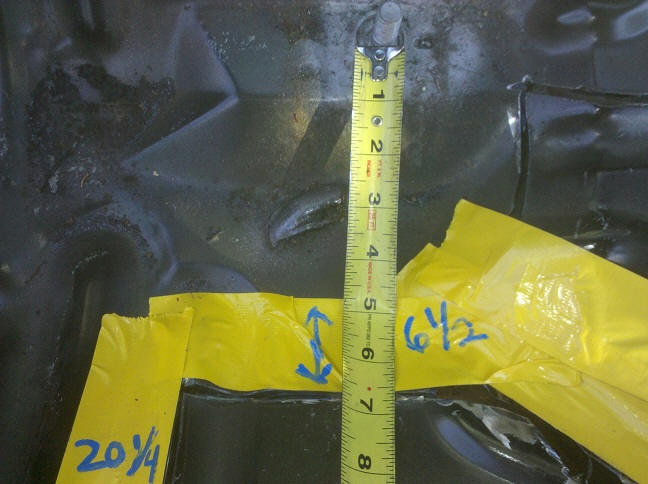
Photo seven (Top cut length) Starting at the point where the passenger's side
cut line intersects with the top cut line measure towards the driver's side rear
door 5 1/4 inches and mark the stopping point of the top cut.
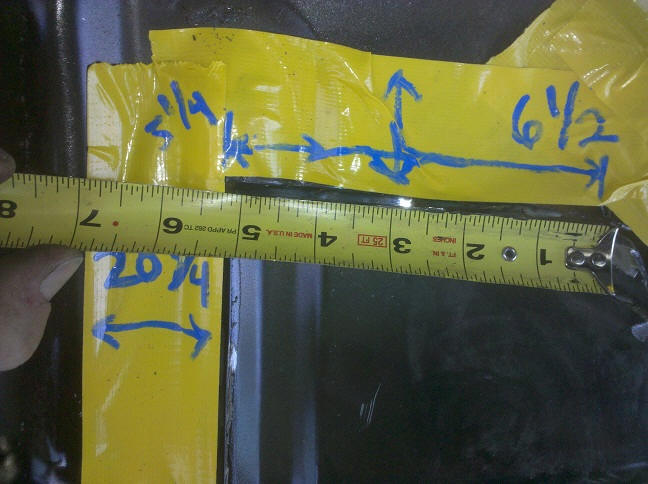
Photo eight (Angle cut) Place tape measure at the point where the top cut ends
on the driver's side. Measure down 5 1/2 inches and rotate the tape measure
until the 5 1/2 inch mark intersects the driver's side cut. This gives you the
angle of the cut. Mark your line following this angle.
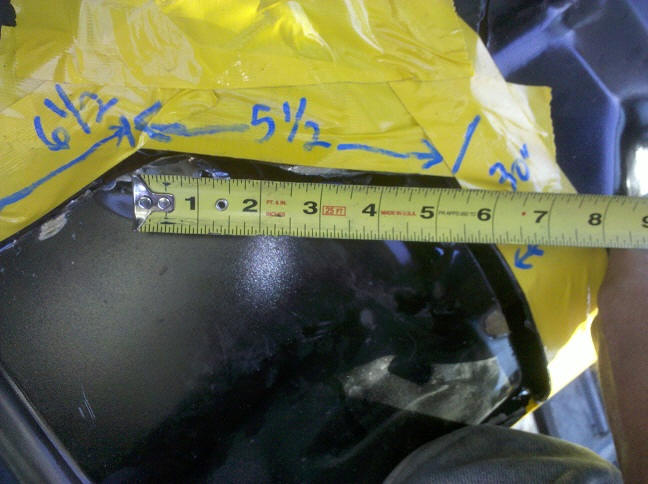
Photo nine (Whole cutout) With the hole outlined You will be ready to cut. Use a
Dremel or light duty grinder such as a Rotozip with a cut-off wheel and keep
your cut shallow. There was, at a minimum, at least 1/2 inch between the closest
hose or wire to the bottom of the car's floor pan, but if you cut too deep you
might hit a wire. The wires were closest under the angle cut.
I would recommend doing the ridge cut first and then tack welding 2 small steel
hinges along that cut to make a hinged door out of this project. After tack
welding the hinges, I would go back and finish the other cuts. I would then line
the 'door' with door edge guard to fill the gap from the cutting wheel. I would
then, after completing my fuel pump replacement, close the door and put in one
or two small tack welds at the corners just to hold the door down. If I ever
needed in there again it would be a simple matter of kissing the tack welds with
the Dremel for a couple seconds and I'm right back in again.
Probably wouldn't hurt to paint the raw metal along the cut lines either, to
prevent rust.
--
Eric Lehmann
97 Ebony 42k Welded - With the Angels Now so that I don't have to be. Long Live
the Garage Queen !
97 Ebony 198k Resurrected, Welded
96 Medium Willow Green Metallic 150k, blown nomo ;-(
96 Rosemist 74k 2006 Best Of SHO, Popular Vote, 2007 Best Gen 3, Welded
96 Charcoal Grey 152k - Resurrected, Welded
©Copyright 2000 - 2009; all rights reserved by V8SHO