Home
| Mailing
List | Specifications | Care
and Feeding | Modifications | Vendors
| Literature

Changing AX4N Valve Body
03/13/2009
Symptoms: My 96 AX4N transmission
would hesitate engaging at a stop sign and eventually completely failed with
no forward or reverse gears. There was absolutely no engagement, so the clutch
pack was not suspected as a problem.
Diagnosis: Before I did anything else, I checked to see if the pump was
working (based on telephone advise from a helpful tranny shop). With the car
cold and NOT running, I checked the tranny fluid and made note of how high on
the dipstick it was (it should be VERY high). I wiped the dipstick off, but
did not replace it yet. I then started the car and inserted the dipstick back
in within 10 seconds, and rechecked the level. Since the level dropped, I
thought the pump was working. Actually, I think if I had re-checked the level
when the engine was warm I would have found the level to still be high (I
later discovered the pump had failed).
I next towed the car to an AAMCO shop that read the computer tranny codes at
no charge. He came up with three codes indicating incorrect gear ratios and a
fourth code (the root-cause code) indicating that the torque converter control
valve was stuck.
The technician (very helpful) suggested that the retaining clip on the control
valve was broken, and this caused the valve to get stuck. This is apparently a
common problem because the valve slams into the retaining clip fairly hard. He
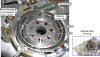
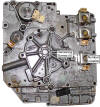
then took me down to the repair area and showed me an AX4N valve body, the
location of the control valve, and what the retaining clip looked like.
Research: Before I began, I went to the library and accessed the
"AllData" web site. This is a mechanic's resource site with a very expensive
subscription, but my library provides it for free. I located the procedure for
removing the pump and valve body from a Taurus. The procedure was not very
clear, but it did show a drawing of what bolts need to be removed. (I have a
better picture shown below though).
I also checked out a copy of the Haynes manual (not Chilton) for the Taurus.
It doesn't describe how to remove the valve body, but it did show me how to
remove the motor mount and sub-frame. However, it failed to tell me I needed
to remove the main cross member (neither did AllData).
==============
Postscript After posting this and re-reading it, I realized that the
rest of this discussion seems one-dimensional. What you should note is that
most of the AX4N tranny problems are related to the valve body. The same
procedure and discussion is useful for ANY valve body problem even though mine
was the pump. Getting the valve body out of the tranny is $1800 worth of the
total repair!
==============
Final Cause: It wasn't until after I got the car apart that I
discovered the real cause of my problem. All of the symptoms pointed to the
control valve. However, I discovered that the pump shaft had sheered and the
pump was fouled up with metal pieces. There was enough friction between the
two halves of the broken shaft to make the pump turn slightly, and this is why
I didn't detect it earlier.
Inside the pump are two guide rings. These broke and the metal pieces were
trapped inside the pump body. The pump would still function properly under
high RPM even without this rings. However, at some point the metal pieces
jammed into the vanes and seized the pump. This caused the pump shaft to sheer
off. The inset photo is an Internet picture of what the pump is supposed to
look like.
 Repair Options: For $200 I could
get new pump parts, but there is a risk that metal got into the solenoids
(which are electromagnets). Or for about the same price, I could get a
complete valve body and pump at a junkyard. I chose the junkyard. (The
junkyard would have provided a completely rebuilt valve body for $350.)
Repair Options: For $200 I could
get new pump parts, but there is a risk that metal got into the solenoids
(which are electromagnets). Or for about the same price, I could get a
complete valve body and pump at a junkyard. I chose the junkyard. (The
junkyard would have provided a completely rebuilt valve body for $350.)
Tools:
When I took on this project, I assumed that with the $2000 savings I could buy
some additional tools. I bought a bunch of tools, but the ones listed below
are what I really needed.
Metric socket set with a wide variety of extensions and universal joints.
Air ratchet is helpful but not required.
Impact wrench with metric sockets.
Jack stands are mandatory.
At least one floor jack.
Disassembly:
To help me reassemble the car, I took a bunch of pictures.
1. Clean the engine compartment to prevent dirt from falling into the open
tranny.
2. Remove the battery, battery box, and battery support bracket.
3. Remove the air intake box and sensors.
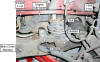
4. Disconnect the main wiring harness that is sitting over the tranny control
cover. This is a large rectangular connector with a bolt running down the
center to hold it together--remove the bolt. You also need to remove this
connector from its mounting bracket. I think there is a retaining tab, and
then it just slides off. This took a little while to figure out.
5. Do what ever else is necessary to get the rest of the wiring out of your
way. Go have a beer, relax, and try it again. You need to have the whole area
directly above the tranny side cover clear in order to remove the cover. It
will be a tight fit as it is.
I noticed from the new batch of photographs that there was another harness
connector I removed. (I suspect two of them actually). This connector is
located above the shift link shown in one of the photos below. It may have
been the one leading to the tranny solenoids.
=============
6. Jack the car up and remove the driver's side wheel.
7. Turn the steering wheel to give you better access to the wheel well.
8. Place at least one jackstand under the car behind the wheel. Important:
Make sure the jackstand is under the unibody frame and NOT under the main
cross member supporting the engine. I had to place an additional jackstand
under the front of the car to keep the right-rear wheel from lifting.
8.5 (Missing Step) Remove the inner plastic splash guard from the wheel well.
9. With the car's frame supported by jackstands, relocate the floor jack to
support the driver's side of the engine (support but don't lift).
10. Remove the isolator (1-nut and 2-bolts) and motor sub-frame (3-bolts and
2-nuts I think). (You won't be able to remove the parts yet.)
 11. Raise the engine slightly (mainly to know it is supported).
12. Remove (at least partially) the two bolts that secure the main cross
member to the unibody frame. (The main cross member is what the isolator is
sitting on. You'll know it when you see it--it is the main support for the
whole front of the car.) This is necessary because you don't have enough
clearance between the cross member and the unibody frame to remove the engine
mount. I found that lowering the cross member an inch or so was all I needed
(I did not remove the bolts). I also found out that my cheap impact wrench was
not strong enough to loosen these bolts. A friend brought his Ingersol-Rand
impact wrench over and made quick work of the bolts.
13. Raise the engine until the engine sub-frame touches the wheel well (as far
as it can move) and remove the isolator by moving it toward the rear of the
car (big hammer helps).
14. Using some finesse, remove the engine sub-frame from the engine first, and
then the transmission. Raise and lower the engine a couple inches as needed to
give you the clearance. Be careful. The reason why this is tough is because
there is a stud on both the engine and transmission that you need to clear
before you can move the frame. Don't bend these studs.
==================
15. Drain the Transmission fluid. I removed the main pan and
drained the fluid before I removed the side pan. I thought I had done this
with almost no mess, but the next morning I discovered that the transmission
had hemorrhaged more fluid over night. I later realized that the cooling lines
had drained over night.
16. Remove the nearly two dozen screws that secure the side pan to the
transmission. Some screws are accessible from the engine compartment and some
are accessible from the wheel well.
17. If the gasket is a thick, ribbed rubber then it is reusable, so be careful
not to damage it. If it is cork, then throw it away.
18. Carefully remove the side pan through the top of the engine compartment.
It will be a tight fit, but it will fit. Remember, the front face of the valve
body has solenoids on it and you don't want to damage these (see picture
below).
19. Disconnect the wire connectors at the 5 solenoids (3-right and 2-left) and
the temperature sensor at the very bottom. (My wiring harness was stiff enough
that replacing it later was a no-brainer--all of the wires lead straight to
their respective solenoid.)
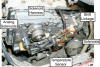
 20. Disconnect the linkage arm at the top-rear of the valve
body (near the wiring harness you just removed).
20. Disconnect the linkage arm at the top-rear of the valve
body (near the wiring harness you just removed).
 21. If I remember correctly, there were 25 screws holding the
valve body to the transmission. The 4 screws across the bottom are shorter
than the others. The 5 of 7 screws through the pump cover are longer than the
others. If you remove a screw that seems too short, stop and put it back in
before removing any others (especially on the pump cover, you don't want the
internal parts to fall out).
21. If I remember correctly, there were 25 screws holding the
valve body to the transmission. The 4 screws across the bottom are shorter
than the others. The 5 of 7 screws through the pump cover are longer than the
others. If you remove a screw that seems too short, stop and put it back in
before removing any others (especially on the pump cover, you don't want the
internal parts to fall out).
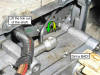
22. With the screws removed, the valve body should pop off the transmission
with just a little effort. Pull it straight back toward the wheel well. Note
that the pump shaft is fit tightly, so cocking the valve body may cause it to
bind. The pump shaft MUST stay with the transmission or you can't remove the
valve body (it extends into the torque converter by about 8 inches). Because
my pump shaft scored the sleeve in the valve body, I had a hard time pulling
the shaft out of the valve body, and thought there might be some type of
retainer--there isn't. It is a slip-fit spline, so everything should come
apart easily.
===================
23. With the valve body removed, if you need to replace any of
the 3 right-hand solenoids, press in on the retainer, rotate them slightly,
and lift them straight out.
24. The two analog solenoids are held in with brackets. Remove the screws and
lift the solenoid out.
25. If you need to replace any of the valves, I would recommend bringing the
valve body to a tranny shop for a rebuild. This should still be pretty cheap.
===============
26. When you replace the valve body and cover, I recommend counting the number
of screws as you torque them down so you don't miss any.
27. After refilling the transmission with fluid, recheck it after running the
engine for a short time, and again after it has warmed up. For me, I forgot
about the fluid that drained out of the tranny cooler, and ended up running
low in the first minute or so.
=====================
=====================
If you like this type of information, you might be interested in some of the
articles I've written. The most popular is "Electricity in the Woodshop" (a
comprehensive discussion about electricity and wiring). Click on the link
below to go to my main web site.
Rick Christopherson
Waterfront Woods
_________________________________________________________________________________________________________________
This came from TCCA and all props and thanks to Rick for one hell of a write
up.
Contact Information
©Copyright 2000 - 2009; all rights reserved by
V8SHO


