
Oil Pump Cleaning and Inspection: Cleaning
| Inspection
Removal
1. Raise vehicle.
2. Remove dual converter Y pipe.
3. Remove oil pan drain plug and drain engine oil from engine.
4. Reinstall oil pan drain plug with a new oil pan drain plug gasket and tighten to 20-34 N-m (15-25 lb-ft).
5. Remove oil pan retaining bolts from transaxle housing.
6. Remove oil pan retaining bolts from lower cylinder blocks.
7. Remove two nuts retaining oil pump screen cover and tube to the oil pump.
8. Remove two nuts retaining oil pump screen cover and tube to the oil pan baffle.
9. Remove two nuts retaining oil pump screen cover and tube to the oil pump.
10. Remove oil pump screen cover and tube and oil pump inlet tube gasket. Discard oil pump inlet tube gasket.

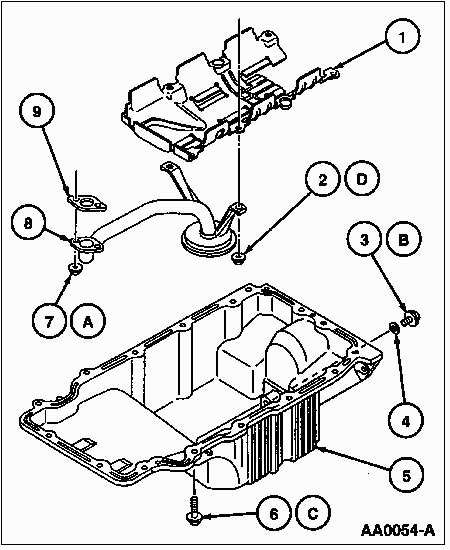
| Item | Part Number | Description |
| 1 | 6687 | Oil Pan Baffle |
| 2 | 95707-08500 | Nut (2 Req'd) |
| 3 | 6730 | Oil Pan Drain Plug |
| 4 | 6734 | Oil Pan Drain Plug Gasket |
| 5 | 6675 | Oil Pan |
| 6 | 90119-08229 | Bolt (16 Req'd) |
| 7 | 95707-06500 | Nut (2 Req'd) |
| 8 | 6622 | Oil Pump Screen Cover and Tube |
| 9 | 6626 | Oil Pump Inlet Tube Gasket |
| A | -- | Tighten to 8-14 N-m (71-123 Lb-In) |
| B | -- | Tighten to 20-34 N-m (15-25 Lb-Ft) |
| C | -- | Tighten to 18-28 N-m (14-20 Lb-Ft) |
| D | -- | Tighten to 14-25 N-m (11-18 Lb-Ft) |
1. Using new oil pump inlet tube gasket, position oil pump screen cover and tube onto studs on oil pump and oil pan baffle.
2. Install two retaining nuts onto oil pump studs and tighten to 8-14 N-m (71-123 lb-in).
3. Install two retaining nuts onto oil baffle studs and tighten to 14-25 N-m (11-19 lb-ft).
4. Clean oil pan-to-lower cylinder block sealing surfaces on oil pan and lower cylinder blocks with shop towel and Metal Surface Cleaner F4AZ-19A536-RA or equivalent meeting Ford specification WSE-M5B392-A.
5. Apply a 4 mm (0.16 inch) thickness bead of Black Silicone Rubber F4AZ-19562-B or equivalent sealant meeting Ford specification WSF-M4G323-A1 on the entire oil pan sealing surface where the oil pan,engine front cover and cylinder blocks contact.
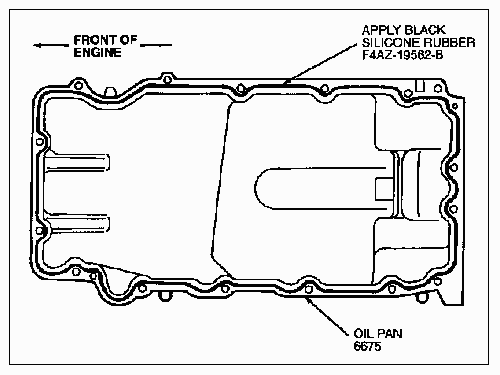
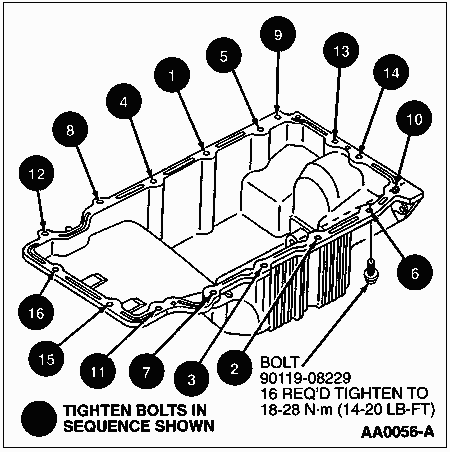
6. Install oil pan and retaining bolts to lower cylinder blocks in locations shown. Tighten bolts in sequence shown to 18-28 N-m (14-20 lb-ft). Tighten oil pan to transaxle bolts to 34-46 N-m (25-33 lb-ft).
7. Install dual converter Y pipe.
8. Replace oil filter.
9. Lower vehicle.
10. Fill crankcase to proper level with engine oil meeting Ford specification WSS-M2C153-F.
11. Start engine and inspect for leaks.
Oil Pump Cleaning and Inspection
Cleaning
Wash all parts in a solvent and dry them thoroughly with compressed air. Use a brush to clean the inside of the oil pump housing and the pressure relief valve chamber. Remove all dirt and metal particles.
Note: Internal components cannot be serviced. If any component is out of specification, replace the complete oil pump.
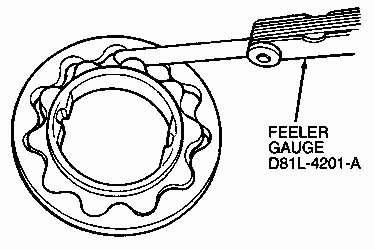
The inner rotor tip-to-outer rotor tip clearance must not exceed 0.06-0.18 mm (0.0024-0.0071 inch) with Feeler Gauge D81L-4201-A or equivalent inserted 12.7 mm (1/2 inch) minimum and rotors removed from the pump housing. See image below.
With the rotor assembly installed in the pump housing, place a Straight Edge D83L-4201-A or equivalent over the rotor assembly and housing. Measure the clearance (rotor end play) between the Straight Edge D83L-4201-A or equivalent and the rotor, and outer race. The clearance should be 0.03-0.09 mm (0.0012-0.0035 inch).
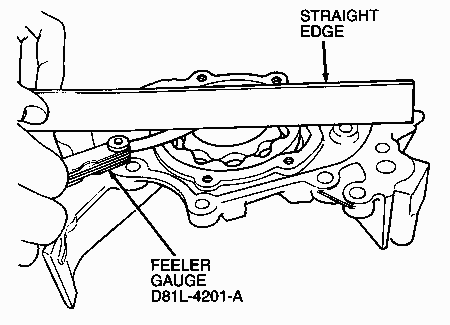
Inspect the relief valve spring to see if it is collapsed or worn. Check the relief valve spring tension. If the spring tension is not within specification or the spring is worn or damaged, replace the oil pump. Check the relief valve piston for free operation in the bore.