
This section deals with the control sensors affiliated with the Electronic Engine Control (EEC) and the Powertrain Control Module (PCM). Various switch and sensor failures were commonly responsible for some drivability problems with the 1989 - 1995 Taurus SHO's, however these problems have yet to repeat themselves with the Third Generation car's. The following is a list of sensors, their operational description, and the removal and installation procedure, where applicable.
Powertrain Control Module (PCM) | Throttle
Position (TP) Sensor | Mass Air Flow (MAF) Sensor
| Intake Air Temperature (IAT) Sensor | Idle
Air Control (IAC) Valve | Engine Coolant Temperature
(ECT) Sensor Heated Oxygen Sensor (HO2S) | Camshaft
Position (CMP) Sensor | Knock Sensor (KS) | Power
Steering Pressure (PSP) Switch | Vehicle Speed Sensor
(VSS)
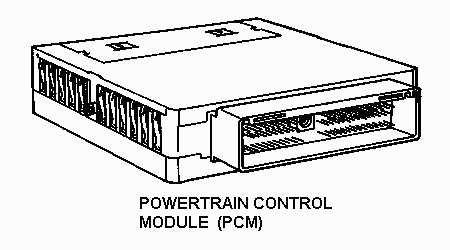
POWERTRAIN CONTROL MODULE (PCM)
The powertrain control module (PCM) performs the following functions:
Removal
1. Disconnect battery ground cable.
2. Remove cowl deflector.
3. Remove screw securing the ground cable of the engine control sensor
wiring to the dash panel.
4. Loosen engine control sensor wiring to PCM connector retainer bolt.
5. Remove engine control sensor wiring from PCM.
6. Remove retaining nuts and powertrain control module insulator from
dash panel.
7. Remove powertrain control module.
Installation
1. Follow removal procedure in reverse order.
2. Tighten insulator retaining nuts to 8-12 N-m (71-106 lb-in).
3. Tighten engine control sensor wiring retainer bolt to 3.7 N-m (32
lb-in).
4. Tighten engine control sensor wiring ground retaining screw securely.
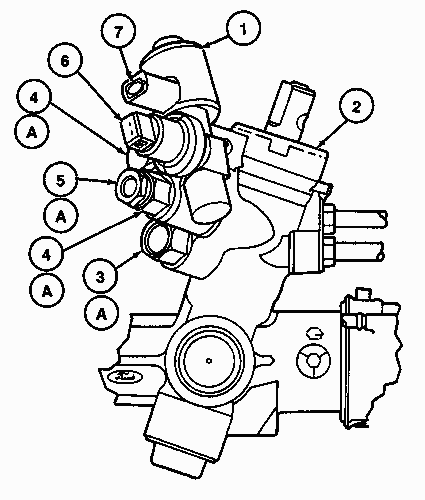
Powertrain Control Module - Mounting
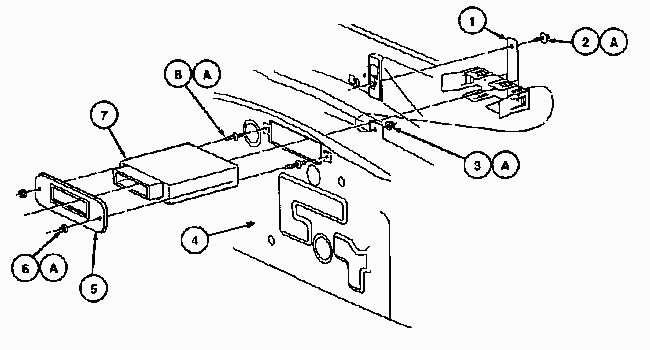
| Item | Part Number | Description |
| 1 | 12A659 | Powertrain Control Module Bracket |
| 2 | N606676-S2 | Bolt |
| 3 | N807718-S36 | Nut |
| 4 | 01610 | Dash Panel |
| 5 | 12B523 | Insulator |
| 6 | N621905-S2 | Nut (2 Req'd) |
| 7 | 12A650 | Powertrain Control Module |
| 8 | N808062-S36 | Stud Bolt (2 Req'd) |
| A | -- | Tighten to 8-12 N-m (71-106 Lb-In) |
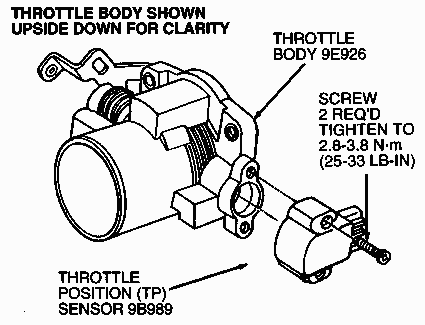
The throttle position sensor (TP sensor) is:
Removal
1. Disconnect battery ground cable.
2. Disconnect engine control sensor wiring from throttle position sensor
(TP sensor).
3. Remove two throttle position sensor retaining screws.
4. Remove throttle position sensor.
Installation
1. CAUTION: Slide rotary tangs into position over throttle shaft blade,
then rotate throttle position sensor clockwise to installed position
only. Failure to install the throttle position sensor in this manner
may result in damage to throttle position sensor or excessive idle speeds.
Note: This throttle position sensor is not adjustable. Install
throttle position sensor. Make sure rotary tangs on sensor are in
proper alignment.
2. Secure throttle position sensor to throttle body with two retaining
screws. Tighten to 2.8-3.8 N-m (25-33 lb-in).
3. Connect engine control sensor wiring to throttle position sensor.
4. Connect battery ground cable.
The mass air flow sensor (MAF sensor):
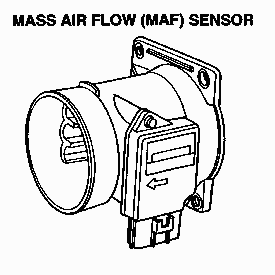
CAUTION: The mass air flow sensor (MAF sensor) is a calibrated unit. Service hot wire engine element and housing as a complete assembly.
Removal
1. Disconnect battery ground cable.
2. Remove air cleaner outlet tube as described in.
3. Disconnect engine control sensor wiring connector from mass air
flow sensor.
4. Remove four retaining nuts from air cleaner cover.
5. Carefully remove mass air flow sensor. Discard gasket.
Installation
1. Position mass air flow sensor with new gasket onto air cleaner cover.
2. Install four retaining nuts. Tighten to 8-12 N-m (71-106 lb-in).
3. Install air cleaner outlet tube.
4. Connect engine control sensor wiring connector to mass air flow
sensor.
5. Connect battery ground cable.
6. Start engine and check for vacuum leaks.
![]()
| Item | Part Number | Description |
| 1 | 9B659 | Air Cleaner Outlet Tube |
| 2 | 12B579 | Mass Air Flow Sensor |
| 3 | -- | Gasket |
| 4 | 9600 | Engine Air Cleaner |
| 5 | -- | Nut (4 Req'd) |
| A | -- | Tighten to 8-12 N-m (71-106 Lb-In) |
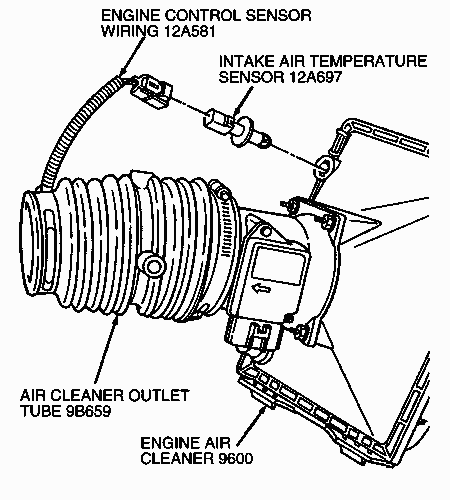
INTAKE AIR TEMPERATURE (IAT) SENSOR
The intake air temperature sensor (IAT sensor) changes resistance in response to intake air temperature. Resistance decreases as the surrounding air temperature increases, providing a signal to the powertrain control module (PCM) that indicates the temperature of the incoming intake air.
Note: The intake air temperature sensor (IAT sensor) is located in the engine air cleaner cover. When installing, use care not to damage plastic locking tabs.
Removal
1. Disconnect battery ground cable.
2. Disconnect engine control sensor wiring from intake air temperature
sensor.
3. Turn intake air temperature sensor 90 degrees counterclockwise and
remove from engine air cleaner cover.
4. Inspect intake air temperature sensor O-ring for damage or deterioration
and replace as necessary.
Installation
1. Follow removal procedure in reverse order.
The idle air control valve (IAC valve):
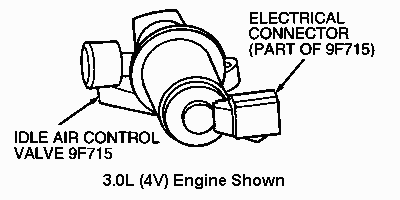
Removal
1. Disconnect battery ground cable.
2. Disconnect the engine control sensor wiring from the idle air control
valve (IAC valve) at the idle air control valve electrical connector.
3. Remove the two idle air control valve retaining bolts.
4. Remove the idle air control valve and idle air control gasket (IAC
gasket).
Installation
1. Note: If scraping is necessary, be careful not to damage idle air
control valve gasket surface or drop material into intake manifold
or throttle body (depending upon application). Clean idle air control
valve gasket mating surfaces.
2. Follow removal procedure in reverse order.
3. Tighten the idle air control valve retaining bolts to 8-12 N-m (71-106
lb-in).

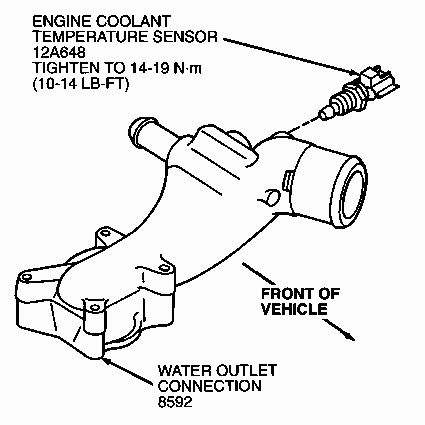
ENGINE COOLANT TEMPERATURE (ECT) SENSOR
The engine coolant temperature sensor (ECT sensor) changes resistance in response to the temperature of the engine coolant. Resistance decreases as the surrounding temperature increases, providing a signal to the powertrain control module (PCM) that indicates the temperature of the engine coolant.
Removal
1. Drain engine cooling system.
2. Disconnect battery ground cable.
3. Remove the engine intake air resonator.
4. Disconnect engine control sensor wiring from engine coolant temperature
sensor .
5. Remove engine coolant temperature sensor.
Installation
1. Follow removal procedure in reverse order.
2. Tighten engine coolant temperature sensor to 14-19 N-m (11-14 lb-ft).
3. Install the engine intake air resonator.
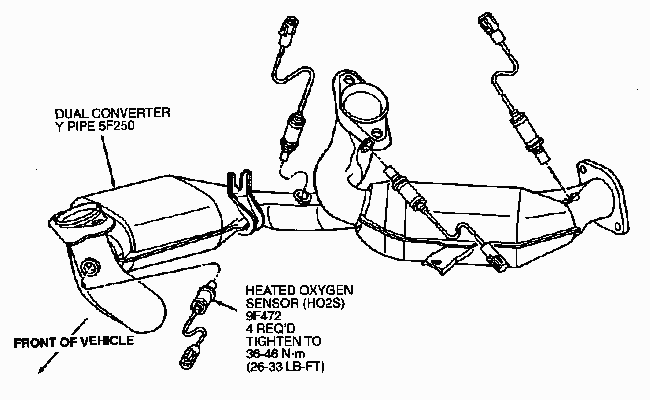
The heated oxygen sensors (HO2S):
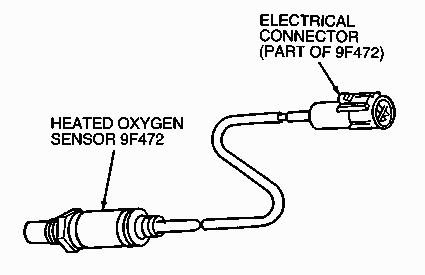
Removal
1. Disconnect battery ground cable.
2. On 3.0L (4V) engine, remove cowl extension and right side of leaf
screen.
3. Disconnect engine control sensor wiring from heated oxygen sensors
(HO2S). Do not remove harness connectors from the brackets.
4. Raise vehicle.
5. Note: If excessive force is needed to remove a heated oxygen sensor,
lubricate with penetrating oil prior to removal. Remove heated
oxygen sensors from exhaust manifolds using Oxygen Sensor Wrench T94P-9472A.
Installation
1. Follow removal procedure in reverse order.
2. Apply a coating of anti-seize compound to threads of heated oxygen
sensor. Tighten heated oxygen sensors to 34-46 N-m (26-33 lb-ft).
CAMSHAFT POSITION (CMP) SENSOR
The camshaft position sensor (CMP sensor) is:
1. Disconnect battery ground cable.
2. Disconnect engine control sensor wiring from camshaft position sensor
(CMP sensor.)
3. Remove camshaft position sensor retaining bolt and remove camshaft
position sensor from engine.
Installation
1. Make sure camshaft position mounting sensor surface is clean and
that camshaft position sensor O-ring is in proper location on camshaft
position sensor .
2. CAUTION: Do not overtighten camshaft position sensor retaining bolt
or damage to camshaft position sensor or engine mounting surface
may occur. Position camshaft position sensor onto engine and install retaining
bolt. Tighten retaining bolt to 8-12 N-m (71-106 lb-in).
3. Connect engine control sensor wiring to camshaft position sensor.
4. Connect battery ground cable.

The knock sensor (KS):
POWER STEERING PRESSURE (PSP) SWITCH
The power steering pressure switch (PSP switch) is:
1. Open hood.
2. Disconnect battery ground cable.
3. Disconnect electrical connector at power steering pressure switch
(PSP switch.)
4. Remove power steering pressure switch from power steering auxiliary
actuator.
Installation
1. Follow removal procedure in reverse order.
2. Replace O-ring on power steering pressure switch. Tighten power
steering pressure switch to 7-14 N-m (62-123 lb-in).
3. Fill and bleed power steering system with Motorcraft MERCON Multi-Purpose
(ATF) Transmission Fluid XT-2-QDX or equivalent meeting Ford MERCON
specification. Check system for leaks and proper operation.
| Item | Part Number | Description |
| 1 | 3N803 | Power Steering Auxiliary Actuator |
| 2 | -- | Rack and Pinion Steering Gear |
| 3 | 3R608 | Power Steering Pressure, Return and Pump Outlet Line Connector Kit (Power Steering Return Port) |
| 4 | -- | Mounting Bolt (Part of 3N803) |
| 5 | 3R608 | Power Steering Pressure, Return and Pump Outlet Line Connector Kit (Power Steering Inlet Port) |
| 6 | 3N824 | Power Steering Pressure Switch (Electrical Connector) |
| 7 | -- | Electrical Connector (Part of 3N803) |
| A | -- | Tighten to 33-41 N-m (25-30 Lb-Ft) |
The vehicle speed sensor (VSS) is: