Home | Mailing List | Specifications | Care and Feeding | Modifications | Vendors | Literature

new 3/24/2004
Flow of Diagnosis
NOTE: Many customers do not understand the limitations of FM reception.
Refer the customer to the Owner Guide for information about the limitations of
FM radio performance.
Internal diagnostic examination of the integrated control panel, rear chassis
unit and audio compact disc player should be left to the authorized radio
service center. However, the automotive technician should be able to analyze and
isolate radio reception conditions to the proper area or component causing the
condition. All radio conditions can be isolated to one of six general areas:
antenna system
integrated control unit
radio speaker system
radio noise suppression equipment
rear chassis unit
audio communications protocol network
Retrieving Diagnostic Trouble Codes (DTCs)
Using Audio System On-Board Diagnostics
The audio system has on-board diagnostic capabilities and is equipped to check
for every component available in the system even if this specific vehicle is not
equipped with all components. A Diagnostic Trouble Code (DTC) will be set for
the missing components. These DTCs can be ignored if the vehicle is not equipped
with these components.
The battery must be fully charged for proper audio system operation. The
ignition switch must be in the RUN or ACC position. Turn the system on, tune in
a strong AM station and verify good reception. After an AM station is checked,
tune in a strong FM station. The system is now ready to enter the diagnostic
mode.
Diagnostic Mode:
NOTE: Battery must be fully charged for proper audio system operation and
self-test.
Enter Diagnostics mode by pressing SEEK DOWN button first and then pre-set
button 3. Hold both buttons for five seconds . This will suspend all normal
radio functions, retain the previously selected frequency and display DIAG.
SYSTEM CONFIGURATION SELF-TEST: Press pre-set button 1. This will check
for connection of all possible devices and log the diagnostic trouble codes for
any device that does not respond. The display will flash SELF while gathering
the diagnostic trouble codes, then stop flashing when complete. To exit System
Configuration Self-test, press pre-set button 1 again. To retrieve diagnostic
trouble codes, press the TUNE UP button. This will display the diagnostic
trouble codes if any exist. Continued pressing of the TUNE UP button will
display the next diagnostic trouble code. Record codes and refer to the
Configuration Self-Test Codes table. To exit the Retrieval Mode, press pre-set
button 1.
CONFIGURATION SELF-TEST CODES
Code
Description
0 - No diagnostic trouble codes logged
1 - No response from rear chassis unit
2 - No response from tape deck
3 - No response from bezel microprocessor
4 - No response from compact disc player
5 - No response from steering wheel controls
6 - No response from rear seat control
7 - No response from remote climate control
8 - No response from navigation module
9 - Read Only Memory verification failed
Remember, system configuration will test for all possible equipment connections.
Inspect the vehicle to determine actual equipment installed.
NOTE: To perform diagnostics, press the appropriate buttons as
instructed.


Integrated control panel display test: To enter the integrated control panel
display test, press pre-set button 5. This check will light all segments in the
integrated control panel. The system will automatically exit this test after
five seconds .

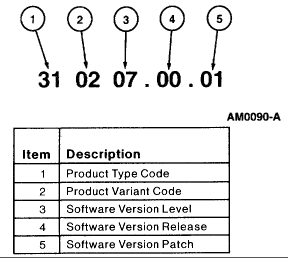
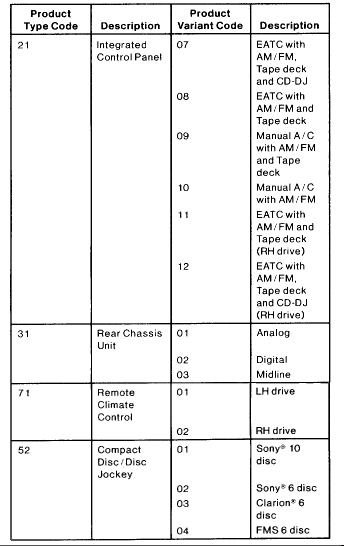
Integrated control panel and rear chassis unit identification: To enter this
test, press pre-set button 3. This test identifies the software level of the
integrated control panel and rear chassis unit. The integrated control panel is
tested first, followed by the rear chassis unit. The completed test will exit
automatically. For code identification, refer to the table. The display will
have two sequences of five codes each. The first sequence is for the integrated
control panel, the second sequence is for the rear chassis unit.
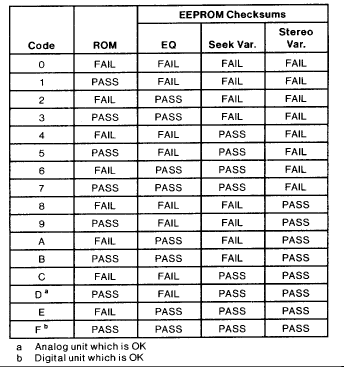
Rear chassis unit self test: To enter this test, press pre-set button 4. This
test will check the rear chassis unit Read Only Memory (ROM) and Electrically
Erasable Read Only Memory (EEPROM) memory chips. The completed test will exit
automatically. For code identification, refer to the table.
Compact disc player: The compact disc player will automatically display
diagnostic trouble codes for unacceptable operating conditions that hinder
normal performance. The table shows code identification. The system will
automatically exit the test upon completion of the test.
COMPACT DISC PLAYER DIAGNOSTIC TROUBLE CODES
Display
Operating Conditions
CD-E1 - Mechanism Error
CD-E2 - Focus Error
CD-E3 - Disc Unreadable
Too Hot - Thermal Shutdown
No CD - Empty Slot or Magazine Not Inserted
No DJ - No Compact Disc Player Detected
Speaker Walk-Around Test
Included in the audio system on-board diagnostic capabilities is the SPEAKER
WALK-AROUND test. This test will automatically adjust the volume to mid-level
and display SPKR on the front control unit. The fade and balance will then
select each speaker as follows: right front, left front, right rear, left rear.
To enter this test while in the diagnostic mode, press pre-set button 2.
To enter this test when not in diagnostic mode, press and hold memory presets 3
and 6 simultaneously and release when SPKR is displayed. In this mode, two
additional self test messages could be displayed:
NO DJ will be displayed if no CD player is detected and the installed radio
chassis is expecting a CD player.
BAD BUILD will be displayed if there is a mis-match between the rear chassis
unit (digital or analog) and the integrated control panel.
Pressing any button during speaker walk-around test will abort this test.
The system will then exit the test automatically upon completion of the test.
Verify the customer's concern by operating the electronic audio system to
duplicate the condition.
Inspect to determine if one of the mechanical or electrical concerns apply:
VISUAL INSPECTION CHART
Mechanical
Integrated control panel with or without tape player physically damaged,
misaligned, any controls inoperative.
Digital audio compact disc player physically damaged, misaligned, any controls
inoperative.
Radio antenna lead in cable, electric antenna or body physically damaged or
misaligned connections.
Radio speaker mounting/speaker cones physically damaged, misaligned.
Radio ignition interference capacitor or radio frequency interference
suppression bond misaligned, unclean and no metal-to-metal contact.
Mobile telephone transceiver; mobile telephone handset, mobile telephone
microphone, mobile telephone transceiver holder cradle physically damaged,
misaligned.
Electrical
Open fuses: fuse junction panel fuses 8 (5 A) , 12 (5 A) , 20 (5 A) , 22 (5 A) ,
24 (5 A) or power distribution box fuse 17 (20 A) .
Open connectors.
Corroded connectors.
If inspection reveals an obvious concern that is readily serviced, correct the
concern before continuing with Inspection and Verification.
If a concern remains after the inspection, determine the symptom(s) and go to
Symptom Chart. See: Procedures\Symptom Chart(s)